
概要
Webサービスとして作ったサイトをガワネイティブでAndroidのアプリにします。
背景
インターネットに公開しているWebサービスのガワネイティブ化がとても簡単だったので紹介です。
やりかた
Android Studioのインストール
まずはAndroidアプリ開発に必須のAndroid Studioをインストールします。

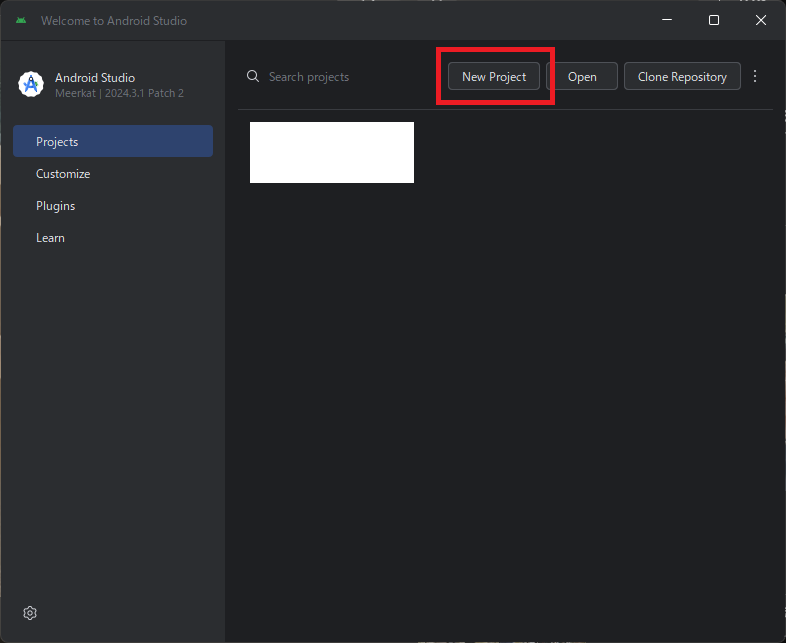
新規プロジェクトの作成
Adnroidの初回起動画面がどのようだったか忘れましたが、適当に [New Project] を探してクリックします。
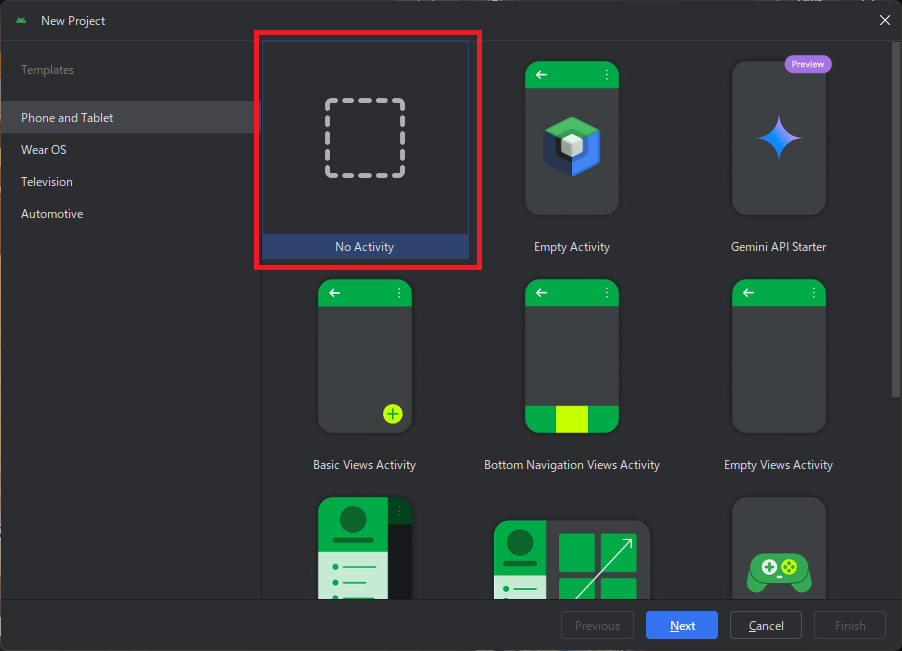
[Phone and Tablet]の[No Activity]をクリックします。
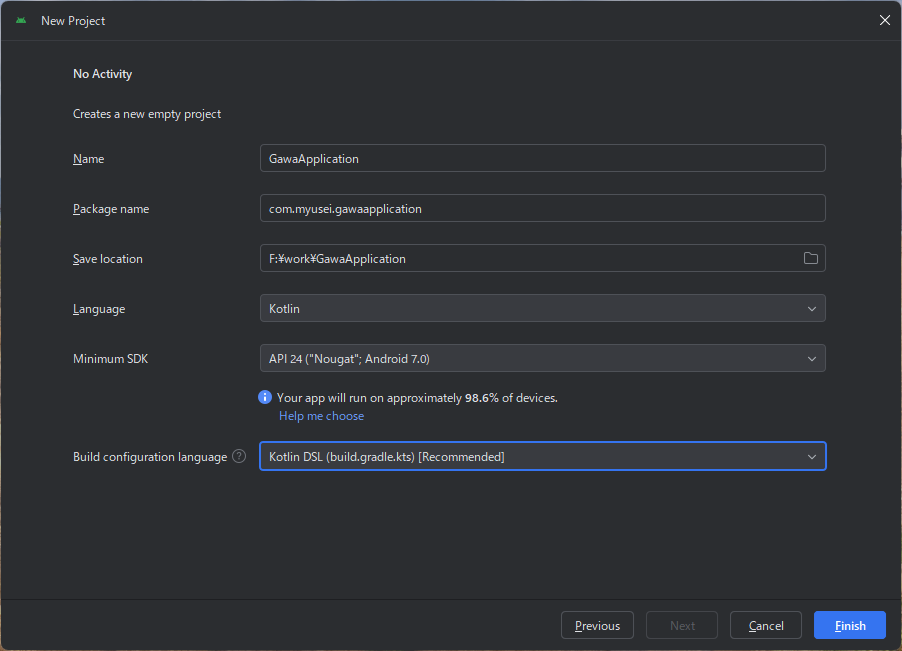
[Name]にアプリの名前、[Language]に[Kotolin]を選択して[Finish]をクリックします。
コードを書いていく
最低限必要なファイルは3つです。
- <Project名>
- app
- src
- main
- java
- <Package名>
- MainActivity.kt #無いから作る
- res
- layout #無いから作る
- activity_main.xml #無いから作る
- layout #無いから作る
- AndroidManifest.xml #あるやつを修正する
- <Package名>
- java
- main
- src
- app
左上のプルダウンリストから[Project]を選ぶとディレクトリが見えるようになります。
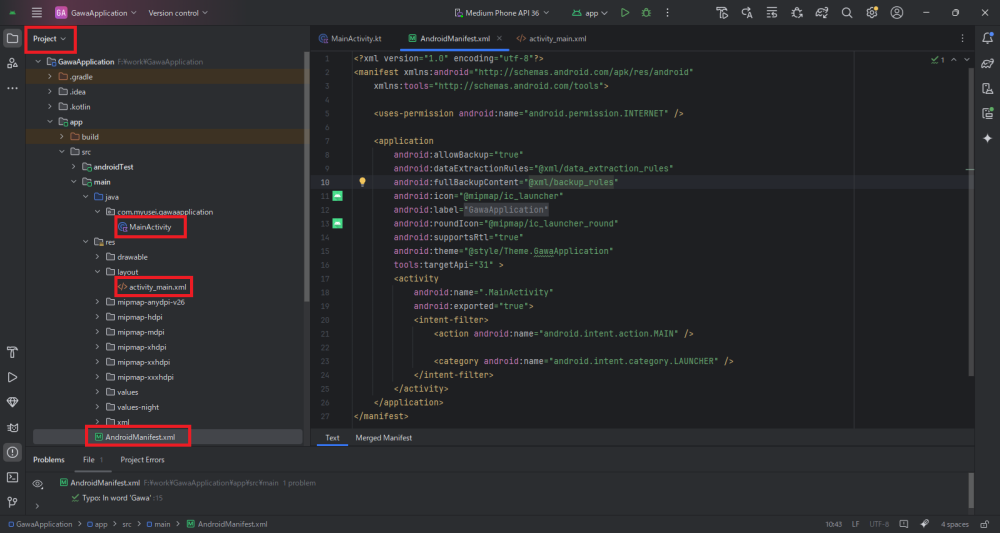
AndroidManifest.xml
自動作成されたAndroidManifest.xmlはこのような形になっていると思います。
<?xml version="1.0" encoding="utf-8"?>
<manifest xmlns:android="http://schemas.android.com/apk/res/android"
    xmlns:tools="http://schemas.android.com/tools">

    <application
        android:allowBackup="true"
        android:dataExtractionRules="@xml/data_extraction_rules"
        android:fullBackupContent="@xml/backup_rules"
        android:icon="@mipmap/ic_launcher"
        android:label="@string/app_name"
        android:roundIcon="@mipmap/ic_launcher_round"
        android:supportsRtl="true"
        android:theme="@style/Theme.GawaApplication"
        tools:targetApi="31" />

</manifest>
次の2つの修正を入れます。Themeなどプロジェクト固有の設定が入っているので丸コピペではなく手で修正されたほうがよいです。
- user-permissionタグにインターネット接続を許可する設定を入れる
- 空要素になっているapplicationタグを開いてあげて、activityタグを差し込む
<?xml version="1.0" encoding="utf-8"?>
<manifest xmlns:android="http://schemas.android.com/apk/res/android"
    xmlns:tools="http://schemas.android.com/tools">

    <uses-permission android:name="android.permission.INTERNET" />

    <application
        android:allowBackup="true"
        android:dataExtractionRules="@xml/data_extraction_rules"
        android:fullBackupContent="@xml/backup_rules"
        android:icon="@mipmap/ic_launcher"
        android:label="@string/app_name"
        android:roundIcon="@mipmap/ic_launcher_round"
        android:supportsRtl="true"
        android:theme="@style/Theme.GawaApplication"
        tools:targetApi="31" >
        <activity
            android:name=".MainActivity"
            android:exported="true">
            <intent-filter>
                <action android:name="android.intent.action.MAIN" />

                <category android:name="android.intent.category.LAUNCHER" />
            </intent-filter>
        </activity>
    </application>
</manifest>activity_main.xml
resディレクトリの下にlayoutディレクトリを作り、さらに下にactivity_main.xmlを作ります。
このファイルは環境によって変える必要はないのでコピペでよいです。
<?xml version="1.0" encoding="utf-8"?>
<androidx.constraintlayout.widget.ConstraintLayout
    xmlns:android="http://schemas.android.com/apk/res/android"
    xmlns:app="http://schemas.android.com/apk/res-auto"
    xmlns:tools="http://schemas.android.com/tools"
    android:id="@+id/main"
    android:layout_width="match_parent"
    android:layout_height="match_parent"
    tools:context=".MainActivity">

    <WebView
        android:id="@+id/webView"
        android:layout_width="match_parent"
        android:layout_height="match_parent"
        app:layout_constraintBottom_toBottomOf="parent"
        app:layout_constraintEnd_toEndOf="parent"
        app:layout_constraintStart_toStartOf="parent"
        app:layout_constraintTop_toTopOf="parent" />

</androidx.constraintlayout.widget.ConstraintLayout>MainActivity.kt
パッケージ名までディレクトリを辿り、MainActivity.ktを作ります。
MainActivity.ktの中身は以下です。1行目と32行目だけ環境にあわせて修正してください。
package com.myusei.gawaapplication //1行目: ここはパッケージ名にあわせて修正

import android.os.Bundle
import android.webkit.WebView
import android.webkit.WebViewClient
import androidx.activity.enableEdgeToEdge
import androidx.appcompat.app.AppCompatActivity
import androidx.core.view.ViewCompat
import androidx.core.view.WindowInsetsCompat

class MainActivity : AppCompatActivity() {
    override fun onCreate(savedInstanceState: Bundle?) {
        super.onCreate(savedInstanceState)
        enableEdgeToEdge()
        setContentView(R.layout.activity_main)

        val webView: WebView = findViewById(R.id.webView)
        webView.webViewClient = object : WebViewClient() {
            override fun onReceivedError(view: WebView, errorCode: Int, description: String, failingUrl: String) {
                super.onReceivedError(view, errorCode, description, failingUrl)
                android.util.Log.e("WEBVIEW_ERROR", "Error $errorCode: $description")
            }
        }
        webView.settings.javaScriptEnabled = true
        webView.settings.domStorageEnabled = true
        webView.settings.loadWithOverviewMode = true
        webView.settings.useWideViewPort = true
        webView.settings.setSupportZoom(true)
        webView.settings.builtInZoomControls = true
        webView.settings.displayZoomControls = false
        webView.clearCache(true)
        webView.loadUrl("https://myusei.com") //32行目: アクセスしたいサイトのURLに修正

        ViewCompat.setOnApplyWindowInsetsListener(findViewById(R.id.main)) { v, insets ->
            val systemBars = insets.getInsets(WindowInsetsCompat.Type.systemBars())
            v.setPadding(systemBars.left, systemBars.top, systemBars.right, systemBars.bottom)
            insets
        }
    }
}
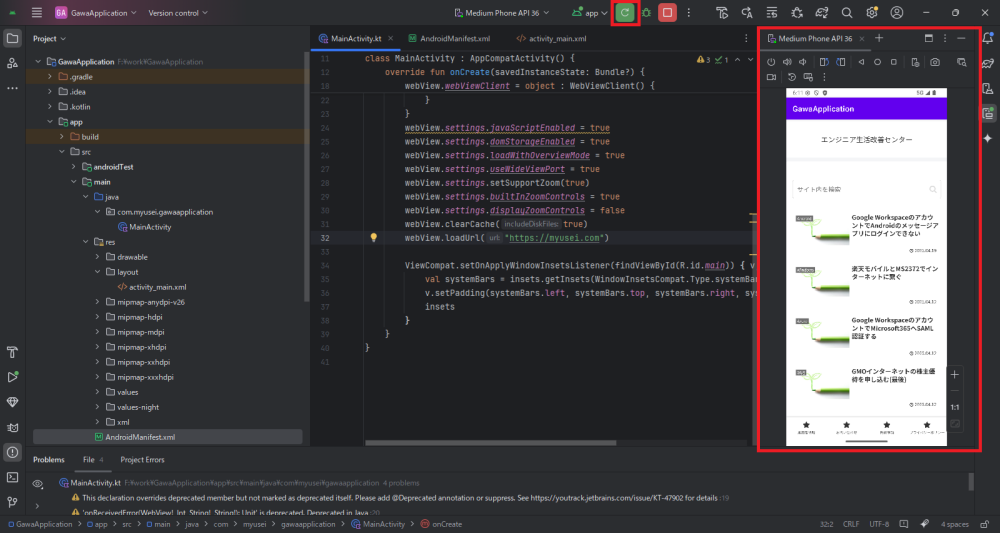
動作確認
準備が終わったので動作確認にいきます。
Android Studio上部の緑の再生ボタン(Run App)を押します。
(スクショでは更新ボタンに見えていますが、Run Appを実行すると変化するだけです)
エミュレータが立ち上がり、MainActivity.ktに書いたURLのページが開けば成功です。
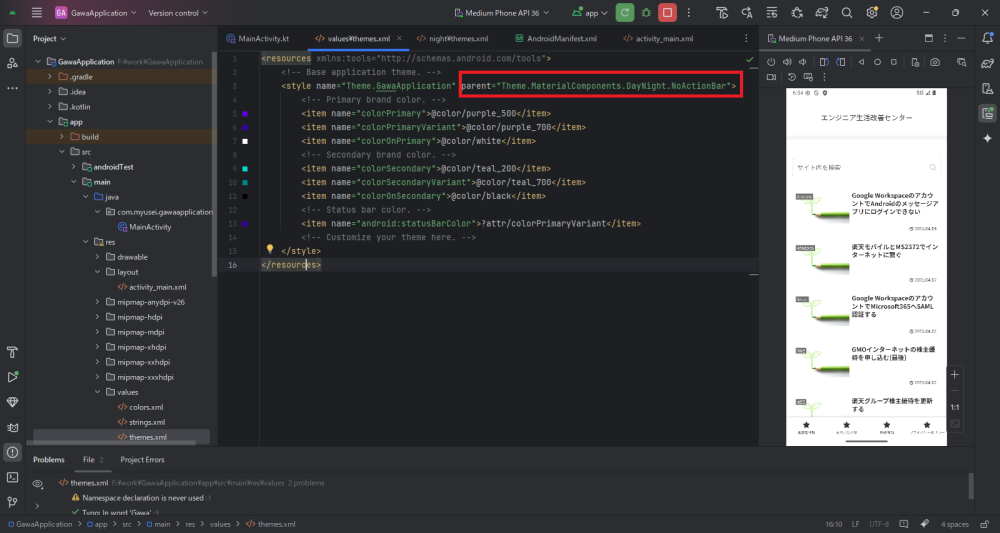
おまけ
ガワアプリでアプリケーションバーがあるとださいと思うので消します。
themes.xmlで定義されています。
- <プロジェクト名>
- app
- src
- main
- res
- values
- themes.xml
- values
- res
- main
- src
- app
[parent=”Theme.MaterialComponents.DayNight.DarkActionBar”]の部分を”DarkActionBar”から”NoActionBar”に編集します。
<resources xmlns:tools="http://schemas.android.com/tools">
    <!-- Base application theme. -->
    <style name="Theme.GawaApplication" parent="Theme.MaterialComponents.DayNight.NoActionBar">
        <!-- Primary brand color. -->
        <item name="colorPrimary">@color/purple_500</item>
        <item name="colorPrimaryVariant">@color/purple_700</item>
        <item name="colorOnPrimary">@color/white</item>
        <!-- Secondary brand color. -->
        <item name="colorSecondary">@color/teal_200</item>
        <item name="colorSecondaryVariant">@color/teal_700</item>
        <item name="colorOnSecondary">@color/black</item>
        <!-- Status bar color. -->
        <item name="android:statusBarColor">?attr/colorPrimaryVariant</item>
        <!-- Customize your theme here. -->
    </style>
</resources>
すっきりした見た目になりました。

コメント